
Gosh, I have been so busy with sewing and other things that I haven't found the time to make a blog post.
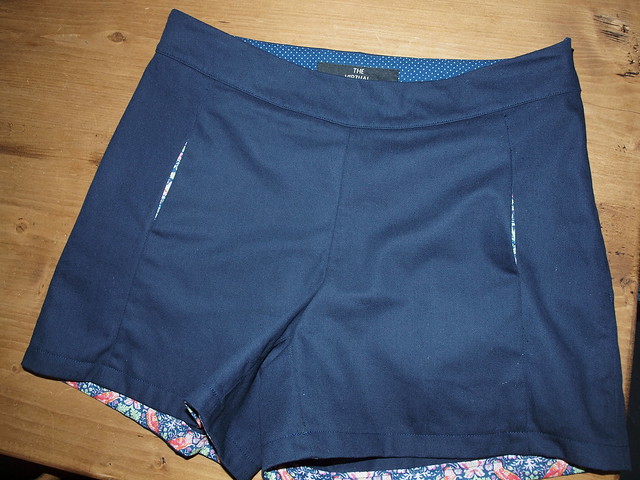
Since my last post I have made two garments, with another half finished. One of the things I completed was a pair of Iris shorts from Colette Patterns, which I made in navy drill, with Liberty lawn pockets, polka dot facings and Liberty faced hems.

Colette patterns are drafted with a pear-shaped figure in mind and, having found the Beignet skirt pattern so wide on my hips, I wasn't sure whether I should bother even trying to make up my first proper pair of shorts/trousers from a pattern I knew would need a lot of alterations to make fit.
I was still on the fence when I had an "aha" moment. I was doing the Susan Khalje Craftsy course, The Couture Dress, and she has you make up a muslin first, but using the stitching lines as your point of reference instead of the cutting lines most of us are used to, and working with a generous seam allowance. I thought I would fit my muslin and then take it apart and use the muslin itself as the pattern pieces, just as she does.
I roughly cut out my paper pattern pieces. Then I decided which size was my starting point. Because it was trousers I went with the hip measurement, which was a size 2 (in this case, a bad move). Have I mentioned that I am NOT pear-shaped? There are only six inches difference between my waist and hip, and I think Colette Patterns have a ten inch difference. With Sewaholic it's a twelve-inch difference. You can imagine how HUGE everything is on my hips (or how small on the waist!) Anyhow, since I chose my size for the shorts by hip measurement it meant I would have to hugely alter the waist size on this muslin. However, it wasn't as simple as that, as it turned out everything was wrong for me, including the crotch depth. But it was surpisingly "possible" to get them to fit in the end because of the way I did it. But I haven't explained yet.
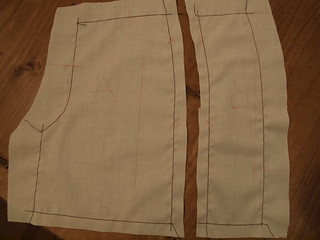
As I said, I roughly cut out my pattern pieces. I marked the stitching lines for the size I chose, 1.5cm in from
what would usually be the cutting line.

I pinned the pattern pieces to the muslin fabric and traced the stitching lines, notches etc. onto the muslin. Then I stitched along the stitching lines to make a permanent reference that wouldn't rub off, and it would stop the fabric stretching out, too.


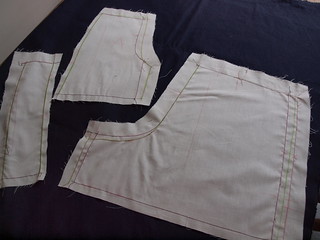
I then stitched the pieces together along the stitching lines and when I tried on the shorts I realised that the whole fit was so wrong on me. I mean, everything. I won't go into details because it would bore the pants off you, but I took the muslin apart, remarked the stitching lines as a size 6 (nearer my waist size) and took in the hips a bit here and there, and tweaked various other bits, like the crotch depth etc. What I ended up with was totally personalised pattern which was nowhere near any of the standard sizes. But instead of having to somehow transfer that to my paper pattern, which would have been too complicated for me to bother, all I had to do was take my muslin apart (having marked all the revised stitching lines carefully) and use it to cut out my main fabric. You can see my revised stitching lines marked in green (click the photos for larger sizes).

It worked really well and I am so happy with the result. I am planning to make the Iris shorts again in red drill, and all I will have to do is use my muslin pieces, which are all nicely folded inside my pattern wallet. How cool is that? I really don't think I could have fitted these shorts if I had just cut out one size, with a 1.5 seam allowance, instead of about a 3cm allowance, in the usual way. I would have ended up binning the whole attempt. I tried the Clover trousers a few months ago and just couldn't get them to fit, having cut out a size 4. Again, it was all wrong. Next time I will cut a size 6 with huge seam allowances and tweak and tweak until they are right, and then use my muslin as the pattern again. I think I can do it. It's a time consuming process, though not too bad for a pair of shorts, and I will only use it for items that require a lot of fitting.


Oh gwad, everytime I see a Collette pattern reviewed by a non-curvalicious-hipped babe I'm so grateful I've never sewed with anything from them (I have the book, wasn't inspired enough to try suffering through all the alterations.. Blargh). On the plus side the pants look great. Contrast pocket lining! Contrast trim! Contrast waistband facing! Your very own label (you minx)! But seriously, have you considered making shorts from a pattern that'll fit straight off the bat? Having tried Ottobre pants (and now working on a Burda pair) there's really something to be said for a hassle free fit from the get go.. BTW how do I contact you? I can't find an email link. Can you email me please?
ReplyDeleteHaha!
ReplyDeleteIt's a good point you make. Why don't I just make up some shorts in a pattern that doesn't need as many alterations? I should, but I suppose I see myself as a bit of a non-standard shape, so I am not confident that there is a pattern out there to suit. Having not looked, that is such a defeatist attitude (as I have suddenly realised!) so I may try out some Burda shorts some time.
I'm glad you mentioned my e-mail address not being in evidence on my blog - I really thought I had set it up on my profile page, but it seems I hadn't.
ReplyDeleteI have now, though. Thanks!
The finished product looks great, but I share your frustrations. I love Collette designs but find their patterns need far too many alternations for my patience. Finally finished my Beignet and must post pics soon.
ReplyDeleteHmm, I still have a couple of Colette dresses to make. Should be interesting, fit-wise!
DeleteI'll look forward to seeing your finished Beignet.
Great looking shorts. Love the look of the dot fabric on the facing and the floral on the hem. It sounds like it was a lot of work to achieve the perfect fit, but it was definitely worth it as you can now make another pair so quickly using your muslin.
ReplyDeleteThank you, Audrey.
DeleteI'm hoping my muslin "translates" well, when making the next pair!
Wow, your shorts look so nice. This pattern is really interesting, I might buy it myself. Your version certainly makes me want to give it a try!
ReplyDeleteThank you Pauline. I think it's worth giving it a go; all the versions I have seen have been good.
ReplyDeleteHi Alice, Thank you so much for sharing this! I'm about to try the Iris shorts and I'm so nervous about the fit. I think I'll try to do your method or something similar. I so rarely make pants or shorts and I think it's mostly because I'm too lazy to do the fitting. :) I'm glad yours worked. It gives me some confidence!!
ReplyDeleteI'm looking best shorts click best shorts for men
ReplyDeleteI'm looking best shorts click best shorts for men
ReplyDelete